DIY

2842 readers
1 users here now

Share your self-made stuff and half-baked projects here.

Also check out !diy@beehaw.org

There is also a related XMPP chat.

founded 2 years ago
MODERATORS
51
52


cross-posted from: https://lemmy.dbzer0.com/post/8959162

I had a rod that was threaded on one half and smooth on the other half. I needed the smooth half to be installed into brick.

method 1: chemical anchor

The normal way to do this (I think) would be to cut some grooves into the rod using an angle grinder, drill a hole that has a diameter that’s ~2mm bigger than the rod, and use chemical anchoring. But that stuff is pricey and only lasts ~1 year on the shelf. Thus cost ineffective for 1 use.

method 2: ad hoc chemical anchor substitute

Similar to the above, I wonder if general 2-component household epoxy would work as a substitute in the above method since people are more likely to have that on-hand. I suspect the issue is that it’s too thin and gravity would do its thing and the topmost area would not get filled with epoxy. Hence why I did not attempt it.

method 3: (What I did)

The rod measured at ø=8.8mm. I had no 9mm drill bit for masonry (and that would be too loose anyway). So I used a nominal 8mm masonry bit on a hammer drill. I’m not sure what the actual diameter of that hole was, but it was too tight to push in the 8.8mm rod in by hand. So I tapped it in, dry (no oil or glues). It worked! It feels really solid. Feels like I got away with murder.

Questions

(method 2) Is there something could be mixed with common 2-component household epoxy to thicken it so it acts more like chemical anchor epoxy?

(method 3) Did I take bad risk with fracturing the brick? Is there perhaps a guide somewhere that safely maps brick hole diameter to metal rod diameter? Or is this something is never done and should never be done?

53


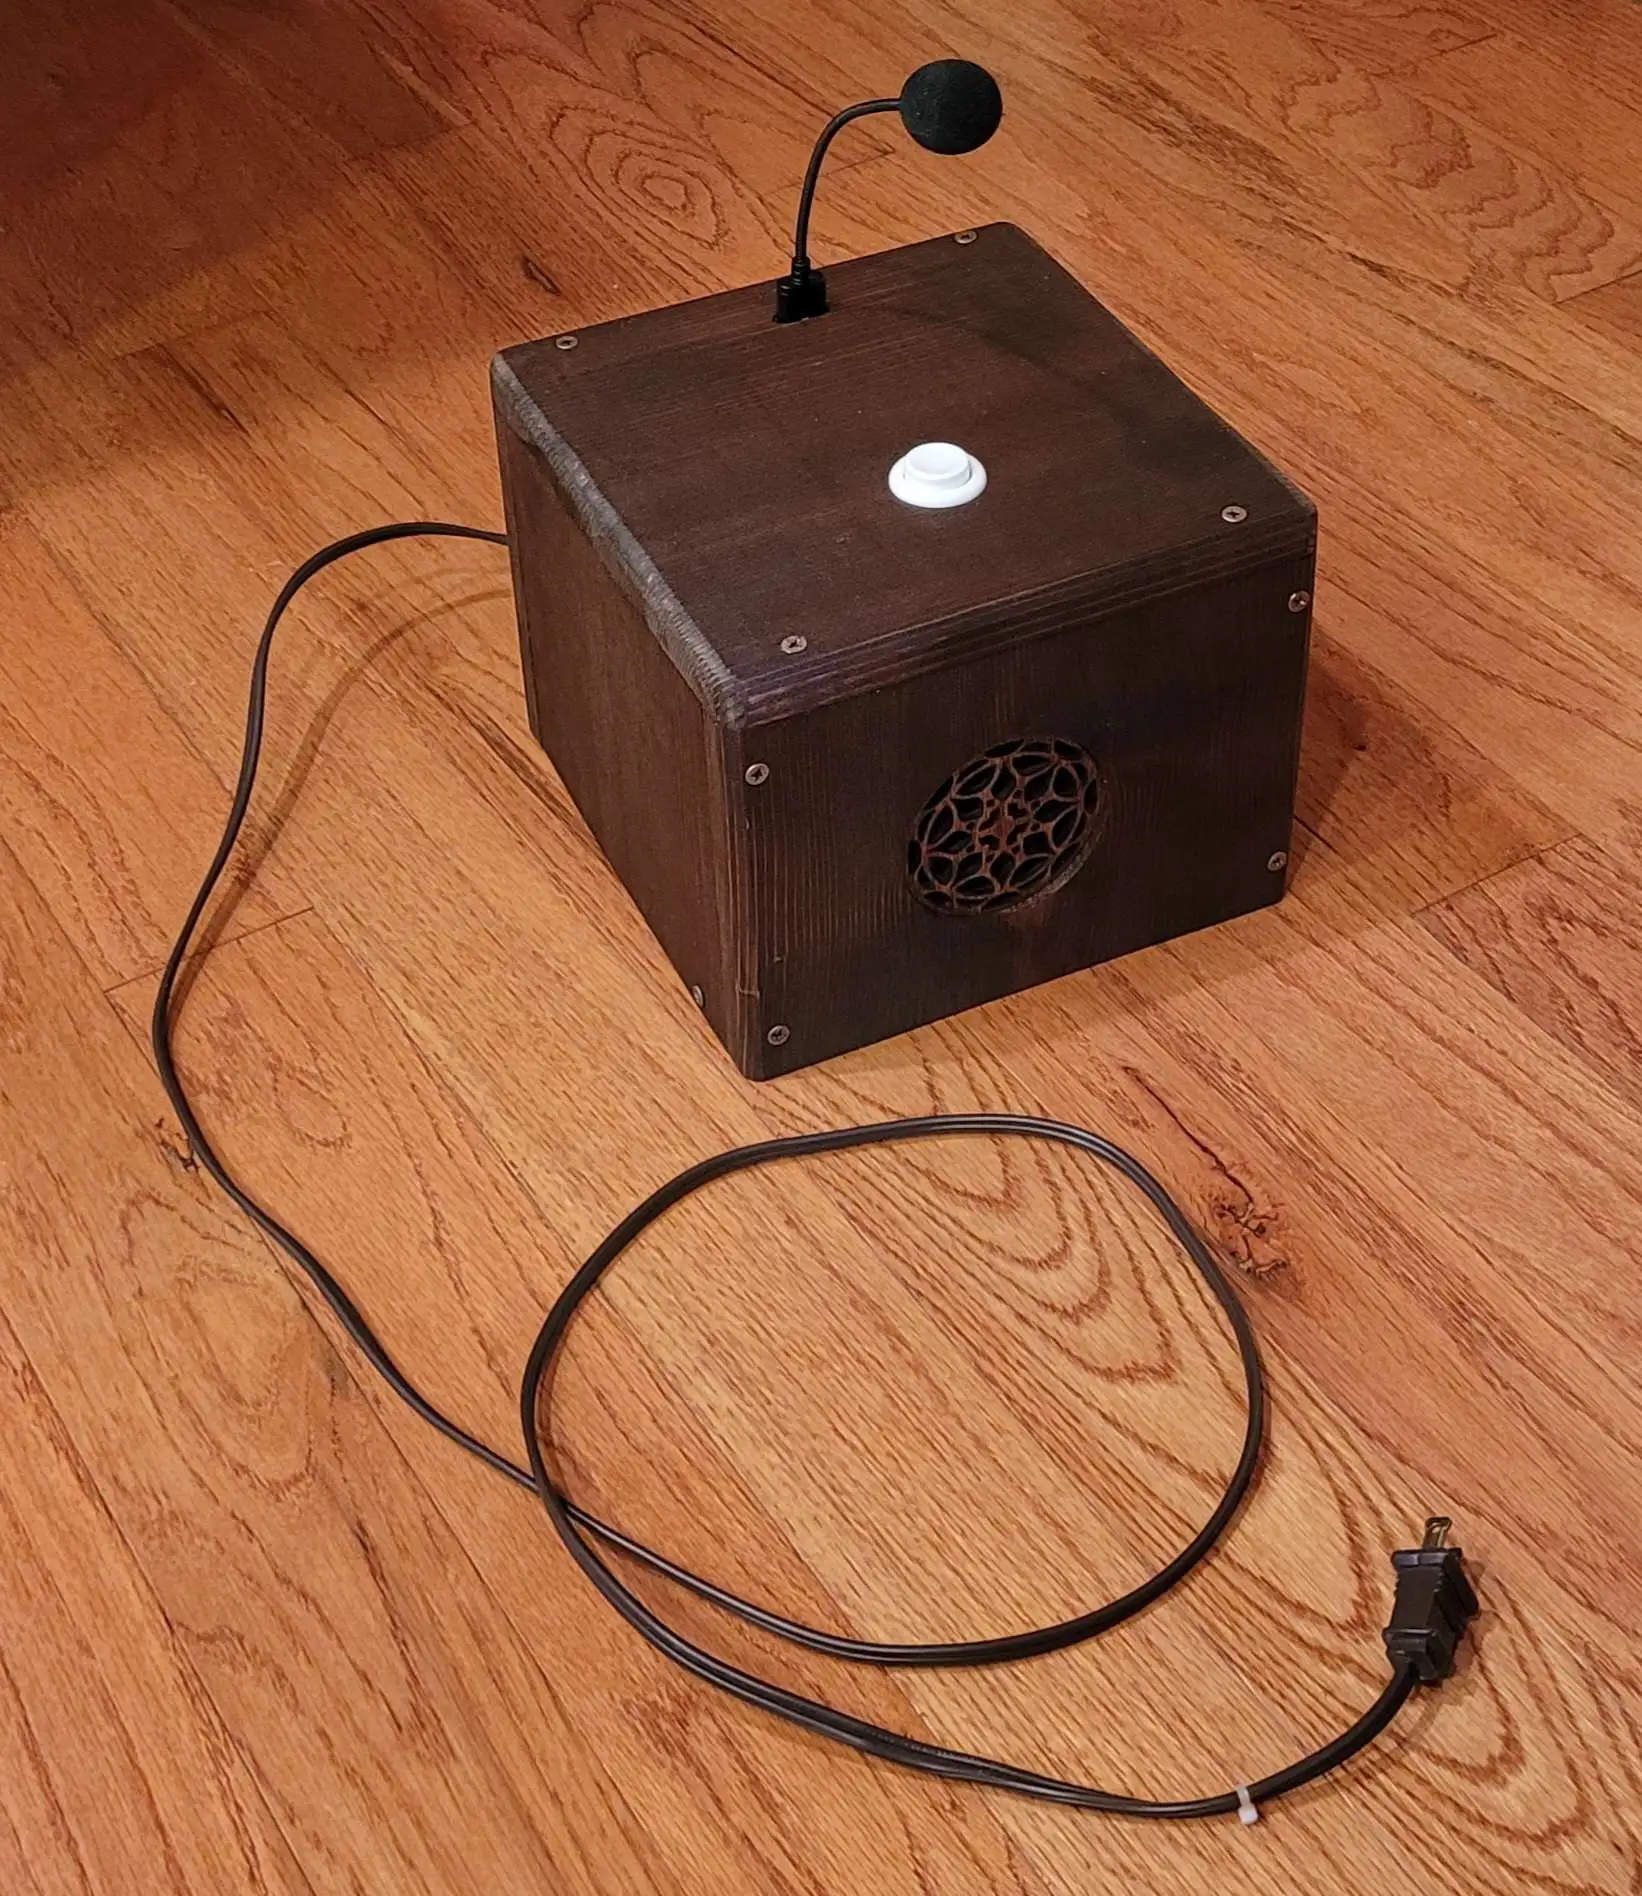
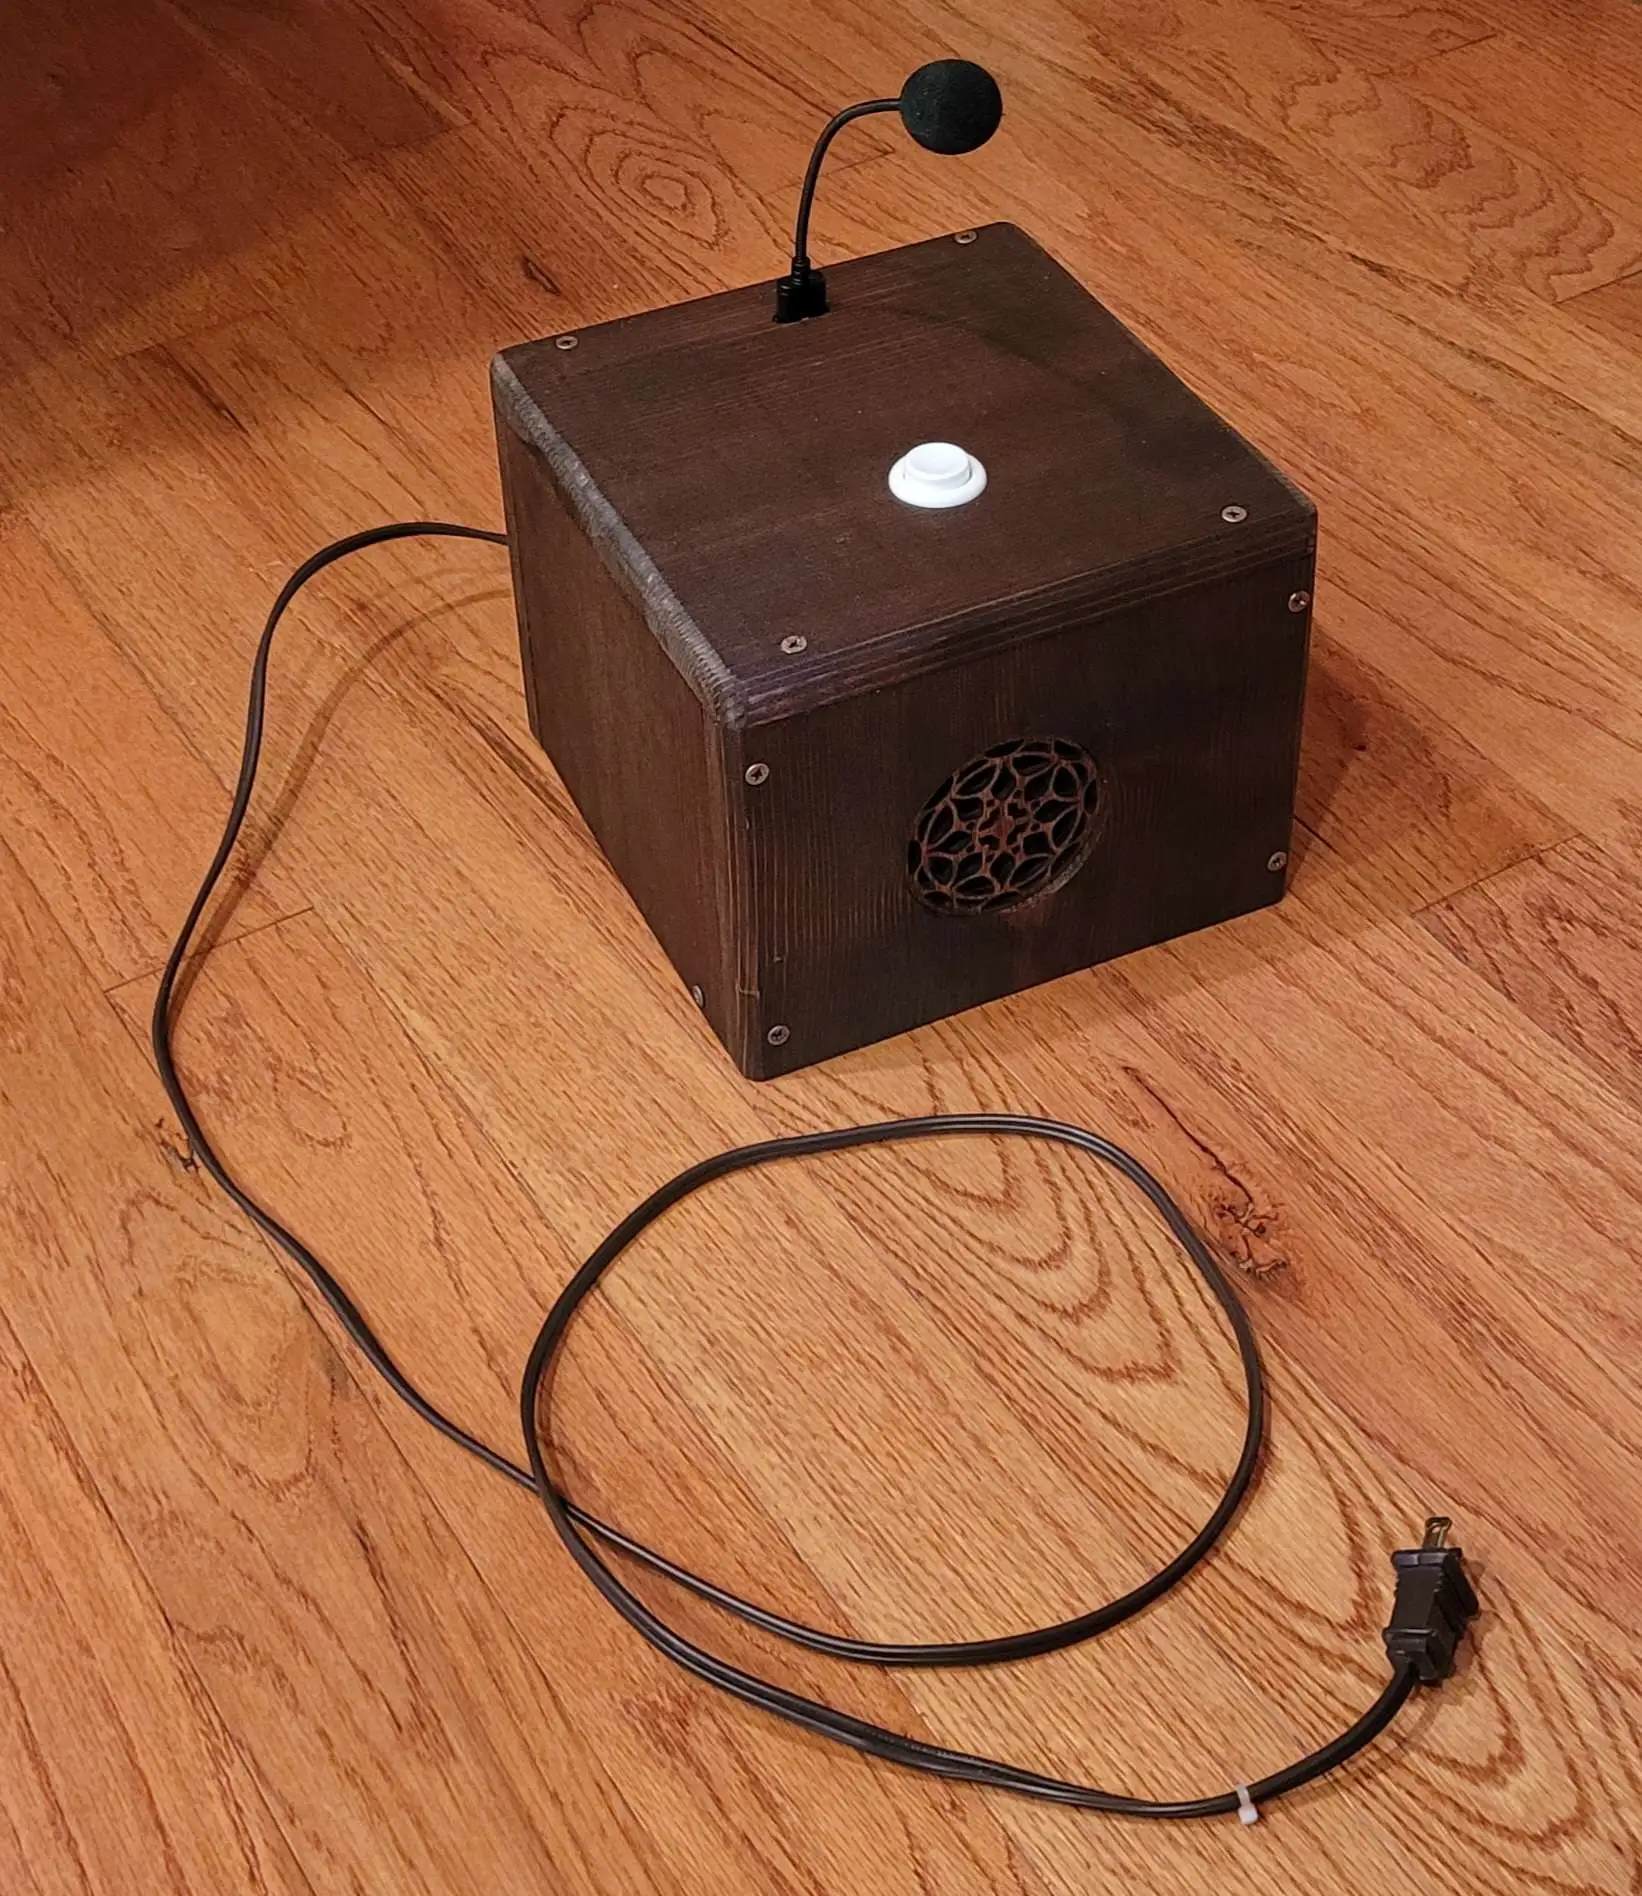
So I was finally able to get back to work on the sound recorder. The general gist is that this is meant to be an audio recorder with transcription and email capabilities, which is also ruthlessly simple to use. There's one button. You push it, a recording says "recording" and it starts recording. You push the button again and it stops recording and says "stop". It now runs the audio file through a speech recognition program, and then creates and sends an email with the transcription in the body and the wav file as an attachment. Relatives can figure out what to do with the content from there.

Progress so far:

I'd planned to follow step 3 of the Pi Spy tutorial but found that DeepSpeech was no longer supported(?) and hadn't really been made with anything less than a Pi4 in mind (I'm using a 3b). Luckily, a bunch of other speech recognition options are available, and I settled on spchcat mostly because it was the first one I found that fit my use case.

If you're going to install it on a raspberry pi, I very much recommend their issues page for getting through dependency hell. Especially if you put a 64bit OS on your pi. (Remember to get the :armhf version of whatever library it needs.) Pulseaudio also seems to help.

This is a pretty short post, I mostly just wanted to make my updated code available. It's... not great. I'm not a programmer by trade, and I'm a strong believer in 'finished not perfect' even when I know what I'm doing. It seems to be functional, that's about all I can promise. Maybe don't let anyone shout bash commands around it. There's also still no error catching around the length of the recording, or the transcription, though that at least doesn't seem to cause any issues when it fails.

This is definitely more of a jumping off point than a proper finished product, but hopefully it'll be useful to someone who's trying to make the same thing or something similar. Even if it's not perfect, maybe it'll save you from repeating some of the work I've done so far.

We're going to do another trial run, see what her feedback is, and update from there.

The updated code is here: https://mega.nz/file/LQlz1BjQ#3R6E9_k1jfmjzFUcBXq_Qi3IGf46iuYtZ95fQlAO-HI

54


There are several DiY communities in the fedi but if we ignore the big centralized instances, there is:

Perhaps each would consider mentioning the other sister community in the sidebar?

55


cross-posted from: https://lemmy.dbzer0.com/post/8721869

Parts like sprockets, chains, hubs, BBs, etc are quite useful for projects to build tools, furniture, art. I get them at no cost by dumpster diving. Cleaning them is quite a pain though. These are some of the options I’ve considered:

  • dishwashing machine— if normal dishwasher detergent is used, I would expect it to corrode aluminum parts (correct? Can someone confirm or deny that?) Chains and /some/ sprockets are steel, right? Would they do well in the dishwasher? I wonder if there is some kind of alternative detergent that won’t harm aluminum since I always have to hand-wash an aluminum pot cover.

  • ultrasonic bath— this method strikes me as the most convenient and what I would expect someone who needs to clean lots parts to use. But there is a risk of de-anodization if you use degreaser. Some jewelers use ultrasonic cleaners with a cocktail of Mr. Clean and ammonia. Would that work well on bicycle parts, non-destructively?

  • Enzyme-based oven cleaner— I tested this on sprockets and it seemed to work quite well but doesn’t get into the nooks and crannies and dissolve any of the mud.

  • Enzyme-based drain cleaner— instructions say wait 6 hours, so i did not test it. Is that time perhaps just because it takes that long to spread down the drain and munch on large volumes of gunk? Perhaps it would work in less time on bicycle parts.

  • boiling water with dish soap— I hoped it would melt the greasy grime. The water was quite dirty afterwards but did not make much noticeable progress.

  • degreaser spray— did not test this. I just have degreaser for kitchen surfaces so maybe not the right stuff.

  • bicycle cleaning spray— kind of strange that this exists. Bicycles have many different materials and different kinds of grime. It did not do too well on greasy sprockets as far as I could tell.

Question on the enzyme-based cleaners: enzymes are a bit pricey by volume compared to other cleaners. Is there a way to store and reuse them? Ideally I would like to pour a bottle of enzyme-based drain cleaner into a bucket and just always soak parts in that same bucket. Do those little guys multiply when you feed them? If the water is always dirty, will the enzymes always be too full to chow down on parts being added?

56


I'm thinking about my next photobash. I've seen photos of projects turning old, likely nonfunctional swimming pools into walipinis, but conventional wisdom has that there's a big difference between an empty concrete swimming pool and a proper foundation. That the sides will collapse without the support of the pool water, or the water table in the ground will lift the thing like a concrete boat and break it. Just the same, it's not uncommon to see abandoned swimming pools laying empty, looking more or less foundation-shaped. It seems like a very solarpunk thing, to turn an expensive-to-maintain luxury into something practical, a greenhouse that takes less energy to keep it warm.

So my question is: can it be done, especially if the pool is already nonfunctional and you're not worried about returning it to its original use? What steps/precautions should you take to make it last and safe? Reinforce the sides? Cut away part of the bottom? Add drainage around it?

Thanks for any thoughts

57


'sup, comrades? i meant to do this thread weekly, but oops! forgot for a month. oh well - what do you have going on, what are you working on?

58


cross-posted from: https://beehaw.org/post/9211466

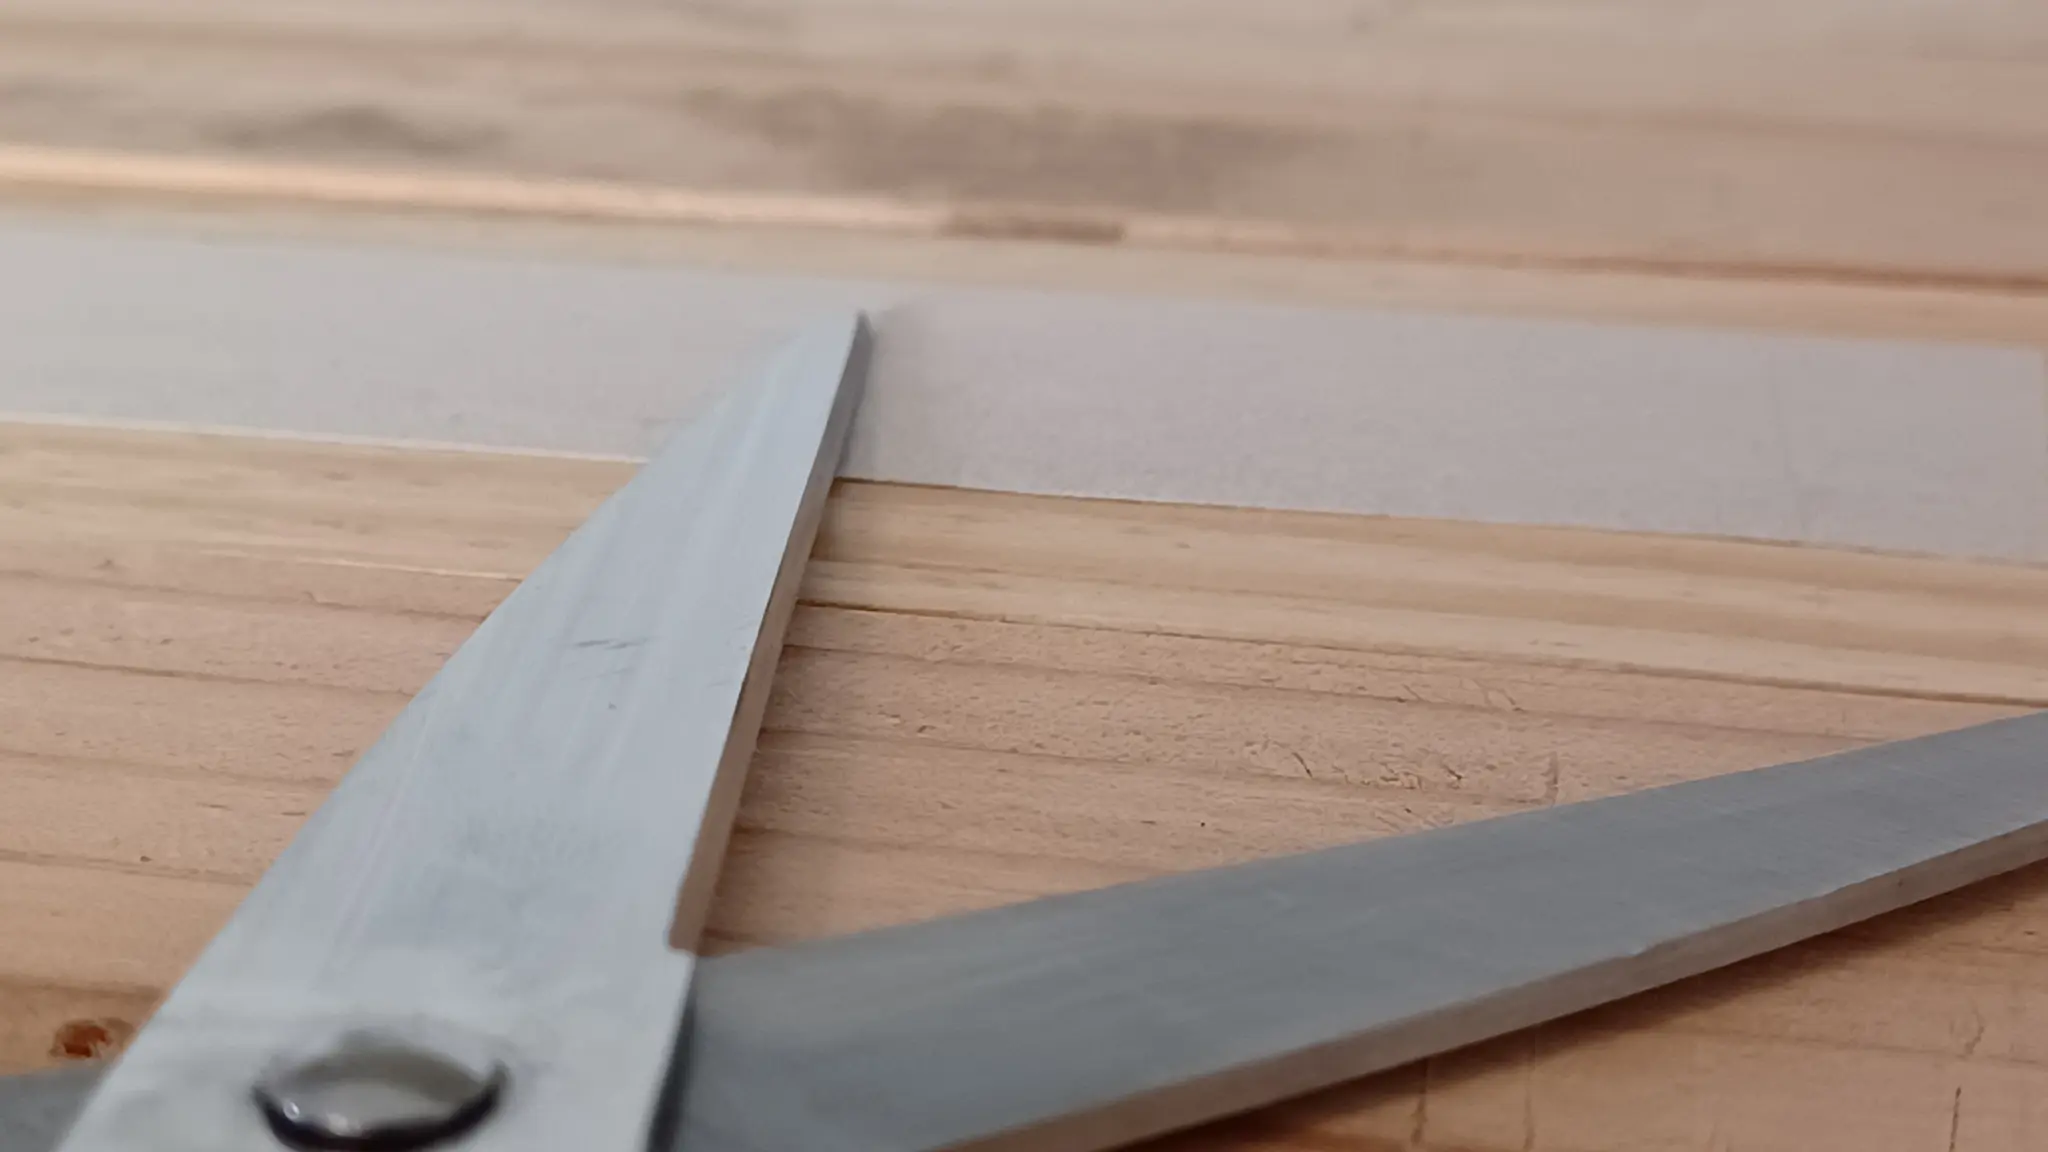
I'm trying to learn how to sharpen scissors. I'm using a draw-filing technique. I'm not sure where I'm doing right or wrong. Anyone has any input? It's a little better than it was but it's definitely not as sharp as it could be. Gonna try attach some pics.

59


My grandmother recently lost her vision. She wanted a sound recorder so she could continue writing/recording her stories, but she's never been comfortable with computers or small electronics, even when she could see them. One of the features she really wanted was automatic transcription voice to text. But all the voice recorders I could find online, even simple ones, seemed like they'd be hard for her to use. They had small buttons, recessed into the case (she has trouble feeling stuff like that), switches on the sides, multiple modes, screens she couldn't see, etc. After the last year of trying to find various devices for her, and of being frustrated at how overly complicated devices supposedly intended for the elderly and vision-impaired still are, I decided to just build something that would actually fit her needs. Unfortunately, I had just a week to do it in before I was heading up to visit.

The goals:

  • It had to be aggressively simple to use. No modes, no settings, no buttons combos to remember.
  • It had to support advanced features (transcription was one she really wanted, but just being able to get the voice files out to relatives easily was big)
  • Sturdy design

I googled around and found this tutorial for making a spy device from a raspberry pi. It was pretty much perfect - when it detected motion, the device was meant to record audio, transcribe it, and then send the transcription out to the 'spy' as an email. That was perfect - email is a robust system all my other relatives are familiar with, figuring out what to do with the files, renaming them, forwarding them as necessary is well within their abilities. Plus the email account could act as a backup.

I started with setting up a button. I used this tutorial as my guide, and used an old arcade button left over from helping a friend build an arcade cab. I soldered a 220 resistor in line with the button per the tutorial. The arcade button was a good fit - it's designed for this kind of project and mounts easily to a hole drilled through a board, it's big and raised up, meaning its easy to find.

Then it was on to the python code:

The changes I had to make were mostly around the motion sensor. We were going to replace that with a single button. Push it once, it plays my voice saying 'recording' and starts recording. Push it again, it stops recording and says 'stop'. It's been years since I wrote python code, but all I really had to do with identify the parts relevant to my requirements and make changes. I ended up using this code for preventing button bounce, since the built-in GPIO features failed to prevent it. The only change was a minor adjustment to the end of look_for_triggers() (which will show up in my code,) because it was preventing the second button press from being detected. I basically just stitched the button_callback() function to start_recording() and replaced the for loop in audioRecording() with a while loop to support variable-length recordings based on the button press. And I used pygame to play my voice audio. The other change I added was to the email feature. I added some try and except error catching, so failing to send an email (like if her wifi goes down) won't crash the program. I won't be around to start it up again so I wanted it to be robust, and to degrade gracefully. I explained that if it says 'email error' after 'stop' that just means it couldn't send an email, but the file is still saved and the program still works.

After getting email to work, the next job was to make sure the program ran as soon as the raspberry pi booted up. My grandmother has lots of friends who love to help, which often means unplugging things, moving them around, losing them, finding them, reorganizing her house, and mailing back audiobooks she hasn't listened to yet. I needed this thing to be able to survive power loss and general curious fiddling. And if it crashed, power cycling would be an ugly but functional way to restart the program.

I used this guide and modified the line to say @reboot python3 /home/audio/sound_recorder_good.py

Once that was done, I found I had to replace the 'input("Press enter to quit")' line at the end of the main function with an endless while loop, because the program was no longer running from the terminal and couldn't use input.

You can find my code here: https://mega.nz/file/OJV1hZJB#pVeddKWKu6EwC6yxiMMsSVSCQdoTUkhtcfWM6ryAYIw

At this point, it was pretty reliable, so I started work on the physical case. It's basically just a wooden box containing the pi, a button, a speaker, the microphone, and built to keep people from opening it up, unplugging components, or fiddling with the speaker settings.

I wrote the woodworking part up with pictures here: https://imgur.com/a/xiVjvdQ

The last of the setup was just connecting it to my grandmother's wifi, packing it all into the case, and making sure it still worked before showing her how to use it. She was very pleased with the overall design, she's going to test it for a couple weeks while I'm away, and if she wants, I'll add transcription and urethane the case when I get back.

60


Hello, everyone. For the past few months, I have been renovating my father's basement, building an apartment for myself. The water, electrical, subfloors, and walls are in. All that really remains are the Kitchen Sink, the kitchen floor, and the doors. (And the bathroom, but thats another can of worms. And the ceiling.

I have been going back and forth on the ceiling for a while. I have been resisting drywall, and my dad is dead set against it; there is a lot of infrastructure down there that would both make it difficult to install, and needs to remain accessible. Furthermore, its only 8feet to the joists, so losing half an inch is kind of a problem. I had considered leaving it alone. I really liked the exposed look, and was even looking into Joist Shelving.

The last few weeks have proven to me though, that I really need to soundproof the ceiling. There is an entire cottage industry on youtube based around recommending soundproofing products. I had one handyman recommend streamer foam, which is different from accoustic foam (apparently!?), Ive seen people recommend Green Glue, and then someone else say, you get the same results with carpet glue. I see some people say Mass Loaded Vinyl could be useful, and then some one else say its expensive and supplemental (but might still be handy for pipes and HVAC). I was looking at sound proof blankets, and the big blocks of Styrofoam insulation they sell at home depot. I was considering hiring someone to install a drop ceiling.

Does anyone have any insight that might help me? I have nothing up in the ceiling currently. I have no real issue mixing and matching solutions, although I am somewhat still resistant to drywall ceilings.

61


This type of battery seems quite easy to DIY. Cheap materials, relatively safe, not flammable.

You can either maken individual cells or make a flow battery which is theoretically infinitely scalable. You'd be limited by the size of the electrode in how much power this battery can deliver.

Has anyone here tried to make a flow battery? And did you have any success with powering something large and energy consuming?

I guess it would also be possible to make a battery out of old buckets, carbon fiber mesh and separator material such as glass fiber.

62


Hi all

I have an electric kettle I use to boil water often. I bought is because it is stainless steel, except for the indicator to see the water level. Of course this plastic part is now leaking...

Does anyone have an idea how to fix it? My idea would be to fill it with silicone, but not sure if that is safe for use with foods

63


'sup, comrades? i figured we could maybe do with a weekly DIY thread on what we're working on, inspired by the rad "Show & Tell" thread from two weeks ago.

what do you have going on, what are you working on?

64


Hi all, I'm reaching out to the community to help with the design of a hex clock.

I'm honestly very lost on where to start. My current plan is to buy some gears and make a large monstrosity which is unlikely to fit on a wall. Does anyone have a more elegant suggestion?

It's following the general design of a clock with two main differences:

  1. There are 256 seconds in the second hands rotation.
  2. There are 4 hands, the 4th of which measures ~136 years in a rotation.
65
66
67
68


Seems interesting as a YT alternative for show-casing DIY projects.

69


Most of this sub is links to youtube tutorials. Lets flip that! post something you completed, is a WIP or tell us about something thats a Dream DIY of yours.

70


Hi DIY punks! I need a little help with something. I've been trying all sorts of ways to home carbonate things as sustainably as possible. Most have not really worked out as intended, but I'm really really close on this latest attempt. This version is to connect a CO2 tank to a whipped cream dispenser.

Basically, the path from the tank looks like this:

...and the path from the dispenser looks like this:

So, I need an adapter to hook up the 3/8"-24UNF female to the mystery connection. It seems to start screwing in for a couple turns, but then won't go any further, so my guess is that it's the same diameter with different threading? Note that, in the link for the mystery hookup, I removed the TR21-4 at the end, because that's for directly hooking up to a small tank. The mystery connection I'm talking about is the male threaded part you can see screwing into the TR21-4 connector.

It doesn't seem like many people are doing this, or know what most of the industry standard connections actually are. See this thread here for example. Consequently, I have no idea if the mystery eBay hookup I bought even works, despite that being its entire purpose. The interior of the CO2 cartridge puncturing mechanism is a black box to me, so I'm just trusting this M22 connection is all that's required. There's definitely some kind of one-way valve in there, but hopefully it doesn't somehow require being "pushed" by the cartridge itself.

71
48
submitted 1 year ago* (last edited 1 year ago) by JacobCoffinWrites@slrpnk.net to c/diy@slrpnk.net


cross-posted from: https://slrpnk.net/post/1581214

I posted this to zerowaste since it's all made of old lumber I found on trash day or got from my local Everything is Free page, but I know the DIY community is a bit more active so I thought I'd share it here too. If you like this sort of thing, I've got more posted over there.

There are bats living around my parent's house. I wanted to build them a house of their own. They seem to like the barn - we think the scratches on the wall below the eaves might be from bats landing and climbing their way up into shelter. They only seem to exist below the eaves, so I'm hoping that's a good sign that they'll notice their new house quickly.

If you've seen my other posts here, you'll know I try to make everything I build out of old materials, stuff I find on trash day, pull from construction debris, or get from my local Everything is Free page, so that was part of the challenge of building this one. I pretty much managed it - the only thing I bought new was the caulking I used to seal the joints, everything else, wood, stains, screws, bituthene, etc was all old stuff.

I started with a kind of motley collection of materials but I like the challenge of finding secondhand stuff that'll work. On the uphand, I didn't have to cut up bigger lumber just to make the spacers, they were all small scraps from other projects. I don't remember where I got the nice piece of half-inch cabinet plywood. The 3/8" plywood came from a fellow I met through Everything is Free, and the pine boards were found on trash day.

I followed this guide from the state of Massachusetts as closely as I could since we're in a similar region, though I had to make it slightly narrower than the specified 17.5 inches because of the dimensions of the 1/2" plywood. I also made the roof slightly wider, because the board was already that length and it seemed like it would offer additional protection, so no need to shorten it.

We had access to a laser cutter through a local makerspace, so my SO and I decided to burn a paisley pattern into the smaller panels just as a quick flourish. I'm actually very pleased with how that little detail looked on the finished version, and it's something I'll play with in future furniture building projects. The sides were slightly longer than the laser cutter's working space, so I had to carve a little of the pattern by hand, but once it was stained they blended in pretty well.

The instructions tell you to cut groves into the interior surfaces to make it easier for the bats to climb. For most of them I did regular horizontal lines, 1/4" to 1/2" apart, but I got bored a couple times and cut climbable murals instead. I tried to emphasize lots of horizontal handholds, and I made sure that each compartment got at least one regular 'ladder' too. Given that they seem to already be climbing the wooden siding of the barn, I think they'll still find this pretty usable.

The instructions all said to stain it with water based stain so the fumes/smell wouldn't bother the bats. I did all the interior surfaces with a can of expresso water-based stain and the outside surfaces with two coats of oil-based stain for improved water resistance (and because I ran out of the water-based stuff). I left all the panels leaning upright on our porch for several weeks so they could offgas with good ventilation, prior to assembly. All the stains came from Everything is Free.

I decided to stain the paisley panels with red mahogany stain and the rest with two coats of ebony to give them a little more contrast. This left the roof and front stained black for maximum sun-warming. On the front paisley panel, which had a frame around the pattern, I did my best to do the inside in red and the frame in black, to match the sides. It was all pretty much hidden by the very distinct grain that piece of plywood happened to have. A prestain might have helped, though I mostly wish I'd had more of the cabinet plywood I used for the upper front and back.

I started assembly by attaching the back to the sides, and started that by caulking the joint. The silicone caulking was the only thing I bought new for this project. I could probably have kept asking around until I found some, but I settled for giving the rest of the tube away on Everything is Free because I didn't think I'd use it for anything before it expired. The directions emphasized that you really want a good seal everywhere except the specified vents, because the bats need to be warm and dry, so I made sure to seal all the exterior joints well.

Once it was all assembled, I added a coat of oil-based urethane to the top and sides of the roof to help with water resistance. If it warped, that could allow drafts and additional moisture intrusion. I also added little bits of trim to the sides under the roof, after sealing that joint a second time.

We hung it partly using some metal strips my dad had from past projects, for attaching chimneys to the roofing around them. They were galvanized and a kind of corrugated pattern. I found two sets of two where the existing holes lined up, and drilled two new ones in each set so they all had four. Then I painted them and attached them to the back.

Another relative provided a scrap of bituthene which we stuck/stapled to the roof for additional waterproofing.

Once it was ready, I pushed it to the top of a tall ladder leveled it against the wall, and put two screws through each metal bracket, then two screws through the landing strip at the bottom, and two toenailed in through the vents on the sides. I'm told that was overkill but I really didn't want any bats we housed to fall off the wall someday. At this point, if it goes, it'll take the siding with it.
72
73
74
75
view more: ‹ prev next ›